
1. Uvod
Hvala na kupoviniasing the Fonestar AS-170RU Hi-Fi Amplifier. This device is designed to provide high-fidelity stereo audio amplification, featuring a built-in USB/MP3 player, AM/FM digital tuner, and multiple audio inputs. This manual provides detailed instructions for safe installation, operation, and maintenance of your amplifier. Please read this manual thoroughly before use and retain it for future reference.
2. Sigurnosna uputstva
- Napajanje: Osigurajte ampUređaj je spojen na napajanje koje odgovara jačinitage specified on the unit. Disconnect the power cord from the outlet if the unit will not be used for an extended period.
- ventilacija: Ne blokirajte ventilacijske otvore. Osigurajte dovoljno prostora oko uređaja za pravilan protok zraka kako biste spriječili pregrijavanje.
- Voda i vlaga: Ne izlažite uređaj kiši, vlazi ili kapanju/prskanju tekućina. Ne stavljajte predmete napunjene tekućinom, poput vaza, na uređaj.
- Izvori toplote: Držite uređaj dalje od izvora toplote kao što su radijatori, grijalice, peći ili drugi uređaji (uključujući ampLifiers) koji proizvode toplotu.
- čišćenje: Čistite samo suvom krpom. Nemojte koristiti tečna sredstva za čišćenje ili sredstva za čišćenje u obliku aerosola.
- servisiranje: Ne pokušavajte sami servisirati ovaj proizvod. Sve servise prepustite kvalificiranom servisnom osoblju.
- plasman: Postavite uređaj na stabilnu, ravnu površinu. Izbjegavajte postavljanje na direktnu sunčevu svjetlost ili u blizinu jakih magnetskih polja.
3. Sadržaj paketa
Molimo Vas da provjerite da li se u Vašem paketu nalaze sljedeće stavke:
- Fonestar AS-170RU Hi-Fi Amplifier
- Daljinski upravljač
- AM antena
- FM antena
- Korisnički priručnik (ovaj dokument)
4. Proizvod je gotovview
4.1 Prednja ploča
The front panel provides access to essential controls and the display.
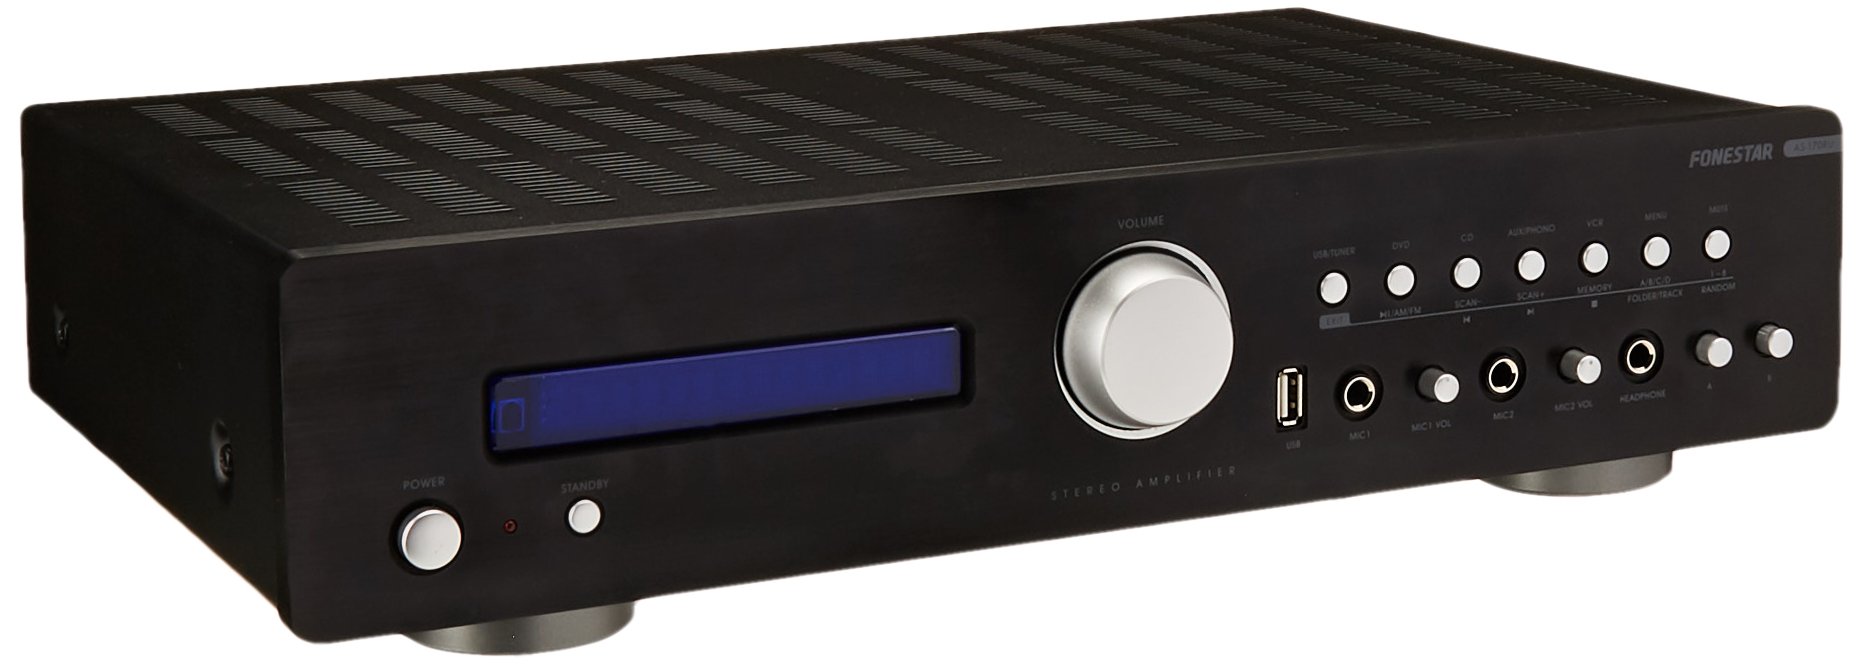
Image: Fonestar AS-170RU Front Panel. Ova slika prikazuje prednju stranu view of the amplifier, showing the VFD display, USB port, headphone output, input selectors, volume knob, and other control buttons.
- Dugme za napajanje: Okreće ampuključite ili isključite punjač.
- VFD Display: Shows current input, volume level, tuner information (frequency, RDS), and USB/MP3 track details (ID3 tag).
- USB port: For connecting USB storage devices to play MP3 files.
- Izlaz za slušalice: 6.3 mm priključak za povezivanje slušalica.
- Selektori ulaza: Buttons for choosing audio sources (CD, DVD, VCR, AUX/Phono, USB/Tuner).
- Kontrola jačine zvuka: Rotary knob to adjust the master volume level.
- Ulazi za mikrofon: Two 6.3mm microphone jacks with independent volume control.
- Kontrole tona: Buttons or menu options for adjusting Bass, Treble, and Balance.
4.2 Zadnja ploča
The rear panel contains all the necessary connections for your audio sources, speakers, and antennas.

Image: Fonestar AS-170RU Rear Panel. This image illustrates the rear connections of the amplifier, including speaker terminals (A/B), various RCA input jacks (CD, DVD, VCR, AUX/Phono), REC OUT, PRE OUT, AMP IN, and antenna connections (FM COAX, AM LOOP ANT).
- Speaker Outputs (A/B): Terminals for connecting two pairs of speakers. Supports 4-16 ohms for A or B, or 8-16 ohms for A+B.
- Audio ulazi (RCA):
- CD ulaz: Za povezivanje CD plejera.
- DVD Input: For connecting a DVD player or other audio source.
- VCR Input: For connecting a VCR or other audio source.
- AUX/PHONO Input: For connecting auxiliary devices or a turntable (Phono input may require a pre-amplifier if your turntable does not have one built-in).
- REC OUT: RCA output for connecting to a recording device.
- PRE OUT: RCA izlaz za povezivanje s vanjskim napajanjem amplifier.
- AMP U: RCA input for connecting an external pre-amplifier.
- Antenski priključci:
- FM COAX 75Ω: Za spajanje FM antene.
- AM LOOP ANT: For connecting the supplied AM loop antenna.
4.3 Daljinski upravljač
The included remote control allows convenient operation of the ampspasilac iz daljine.

Image: Fonestar AS-170RU Remote Control. This image shows the remote control unit with various buttons for power, input selection, volume, mute, tuner functions, USB playback controls, and tone adjustments.
- PRIČEKAJ: Uključivanje / isključivanje napajanja.
- Selektori ulaza: Buttons for CD, DVD, VCR, AUX/PHONO, USB/TUNER.
- Jačina/stišavanje (VOL +/-): Podešava glavnu jačinu zvuka.
- MUTE: Utišava audio izlaz.
- AM/FM: Switches between AM and FM tuner modes.
- SKENIRAJ: Skenira radio stanice.
- SJEĆANJE: Stores radio station presets.
- Kontrole reprodukcije s USB-a: Play/Pause, Stop, Skip Track, Folder/Track navigation.
- EQ OFF / BASS / TREBLE: Access tone controls.
- RDS / ID3: Displays RDS information for radio or ID3 tag za MP3 files.
5. Podešavanje
5.1 Povezivanje zvučnika
- Osigurajte ampUređaj za ispuštanje pare je isključen i iskopčan iz električne utičnice.
- Connect your speakers to the "SPEAKERS OUTPUT" terminals on the rear panel.
- Uskladite pozitivni (+) pol amplifier (red) to the positive (+) terminal of your speaker, and the negative (-) terminal (black) to the negative (-) terminal.
- The AS-170RU supports two groups of speakers (A and B). You can connect one pair to "SPEAKERS A" and another to "SPEAKERS B".
- Provjerite da impedancija vaših zvučnika odgovara amplifier's specifications: 4-16 ohms for A or B, or 8-16 ohms for A+B.
5.2 Povezivanje audio izvora
Use RCA cables to connect your audio components to the corresponding input jacks on the rear panel.
- CD plejer: Spojite na ulaz "CD".
- DVD plejer: Connect to the "DVD" input.
- VCR: Connect to the "VCR" input.
- Auxiliary Device (e.g., smartphone, tablet): Connect to the "AUX/PHONO" input.
- Gramofon: Connect to the "AUX/PHONO" input. If your turntable does not have a built-in pre-amplifier, you may need an external phono pre-amplifier.
5.3 Povezivanje antena
- FM antena: Connect the supplied FM wire antenna to the "FM COAX 75Ω" terminal. Extend the wire for optimal reception.
- AM antena: Connect the supplied AM loop antenna to the "AM LOOP ANT" terminals. Position the loop for best reception.
5.4 Priključak za napajanje
Nakon što su svi audio i zvučnički priključci uspostavljeni, priključite ampUključite kabel za napajanje spasioca u odgovarajuću utičnicu za naizmjeničnu struju.
6. Uputstvo za upotrebu
6.1 Osnovni rad
- Uključivanje/isključivanje: Press the Power button on the front panel or the STANDBY button on the remote control to turn the ampuključite ili isključite punjač.
- Odaberite izvor ulaza: Press the desired input selector button on the front panel (CD, DVD, VCR, AUX/PHONO) or the remote control (CD, DVD, VCR, AUX/PHONO, USB/TUNER).
- Podesite glasnoću: Okrenite dugme za jačinu zvuka na prednjoj ploči ili koristite dugmad VOL +/- na daljinskom upravljaču da biste podesili nivo zvuka.
- Isključi zvuk: Press the MUTE button on the remote control to temporarily silence the audio. Press it again to restore sound.
6.2 USB/MP3 Playback
- Insert a USB storage device (flash drive) into the USB port on the front panel.
- Select "USB/TUNER" as the input source. The ampLiferier će automatski prepoznati i početi reproducirati MP3 files.
- Use the playback controls on the remote control (Play/Pause, Stop, Skip Track, Folder/Track) to navigate and control your music.
- The VFD display will show track information, including ID3 tags ako je dostupno.
- The amplifier supports up to 65,000 indexable folders and files, with a maximum of 8 folder levels.
6.3 AM/FM Tuner Operation
- Select "USB/TUNER" as the input source, then press the AM/FM button on the remote control to switch between AM and FM bands.
- Automatsko skeniranje: Press the SCAN button on the remote control to automatically search for and store available radio stations.
- Ručno podešavanje: Use the tuning buttons (usually arrow keys) on the remote control to manually adjust the frequency.
- Unaprijed postavljene stanice: The amplifier supports 64 presets. Use the MEMORY button to store and recall your favorite stations.
- RDS funkcija: If available, press the RDS button on the remote control to display Radio Data System information (e.g., station name, program type).
6.4 mikrofonska ulaza
- Connect microphones to the 6.3mm MIC 1 and MIC 2 jacks on the front panel.
- Adjust the independent volume controls for each microphone to achieve the desired level.
6.5 Kontrola tona i balansa
The amplifier allows adjustment of bass, treble, and balance through its menu system or dedicated buttons on the remote control. Refer to the remote control section for specific buttons like EQ OFF, BASS, TREBLE.
7. Održavanje
- čišćenje: Disconnect the power before cleaning. Use a soft, dry cloth to wipe the exterior surfaces. Do not use abrasive cleaners, waxes, or solvents.
- ventilacija: Povremeno provjeravajte da li su ventilacijski otvori čisti od prašine i ostataka.
- Skladištenje: Ako uređaj skladištite duži period, isključite ga iz električne utičnice i čuvajte ga na hladnom i suhom mjestu, dalje od direktne sunčeve svjetlosti i ekstremnih temperatura.
8. Otkrivanje problema
If you encounter problems with your amplifier, refer to the following table for possible solutions.
| Problem | Mogući uzrok | Rješenje |
|---|---|---|
| Nema struje | Kabel za napajanje nije priključen; Utičnica je neispravna; AmpLifier u standby modu. | Ensure power cord is securely plugged in. Test the outlet with another device. Press the Power/STANDBY button. |
| Nema zvuka | Odabran pogrešan ulaz; Jačina zvuka je preniska; Zvučnici nisu pravilno povezani; Funkcija isključivanja zvuka je aktivna. | Select the correct input source. Increase volume. Check speaker connections. Deactivate MUTE. |
| Loš radio prijem | Antenna not connected or poorly positioned; Interference. | Connect and adjust the position of the AM/FM antennas. Move the amplifier away from other electronic devices. |
| USB reprodukcija ne radi | USB uređaj nije pravilno umetnut; Nekompatibilan file format; USB device faulty. | Ensure USB device is fully inserted. Check if files are MP3 format. Try a different USB device. |
| Amplifier turns off unexpectedly or cycles power | Overheating; Short circuit in speaker wiring; Internal fault. | Ensure adequate ventilation. Check speaker wires for frayed strands causing short circuits. If the problem persists, disconnect power and contact qualified service personnel. |
9. Specifikacije
- Model: AS-170RU
- Izlazna snaga: 80 + 80 W RMS at 4 Ω
- Impedansa zvučnika: 4-16 Ω (A or B), 8-16 Ω (A+B)
- zaštita: 3 circuits (short circuits, overload, overvoltage)
- USB plejer: MP3 file playback, ID3 tag support. Max 65,000 indexable folders/files, max 8 folder levels.
- tjuner: Digital AM/FM, 64 presets, RDS.
- Ulazi: 2 x Microphone (6.3mm), 4 x RCA (CD, DVD, VCR, AUX/Phono), 1 x RCA (AMP IN).
- Izlazi: 1 x RCA (REC OUT), 1 x RCA (PRE OUT), Headphone (6.3mm).
- Prikaz: Blue VFD.
- Kontrola tonova: Bass, Treble, Balance (via menu/remote).
- Dimenzije: 40 x 40 x 60 cm (približno 15.7 x 15.7 x 23.6 inča)
- Težina: 7.2 kg (približno 15.87 lbs)
10. Garancija i podrška
For warranty information and technical support, please refer to the warranty card included with your product or contact your authorized Fonestar dealer. Do not attempt to repair the unit yourself, as this may void your warranty.