1. Uvod
This manual provides detailed instructions for the setup, operation, and maintenance of your Vibe Axcess 5-in-1 Universal Remote. Please read this manual thoroughly before using the remote control to ensure proper functionality and to maximize your user experience. This remote is designed to control up to five different audio/video devices.
2. Proizvod je gotovview
The Vibe Axcess 5-in-1 Universal Remote is designed to consolidate control of multiple home entertainment devices into a single unit. It features dedicated buttons for various functions and device types.
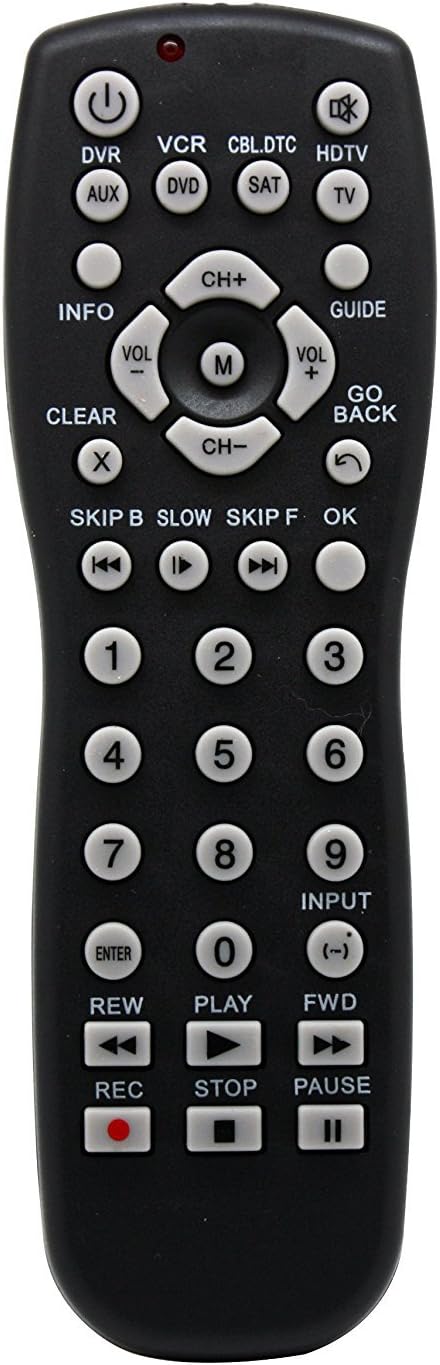
Slika 1: Front view of the Vibe Axcess 5-in-1 Universal Remote. This image displays the remote's layout, including device selection buttons (DVR, VCR, CBL.DTC, HDTV, AUX, DVD, SAT, TV), navigation pad, number keys, and media control buttons (REW, PLAY, FWD, REC, STOP, PAUSE).

Slika 2: Packaging of the Vibe Axcess 5-in-1 Universal Remote. The packaging highlights the remote's 5-in-1 capability and compatibility with various device types such as DVD/VCR, HDTV, DVD, AUX, and CBL/SAT/CABLE.
3. Podešavanje
3.1 Instalacija baterije
- Pronađite poklopac odeljka za baterije na poleđini daljinskog upravljača.
- Pomaknite poklopac prema dolje ili pritisnite bravu i podignite da biste ga otvorili.
- Umetnite dvije (2) AAA baterije, pazeći da pozitivni (+) i negativni (-) terminali odgovaraju dijagramima unutar odjeljka.
- Vratite poklopac pretinca za baterije, gurajući ga nazad na mjesto dok ne klikne sigurno.
Napomena: Always use fresh batteries and replace both batteries at the same time. Do not mix old and new batteries or different types of batteries.
3.2 Programiranje daljinskog upravljača
To control your devices, the universal remote must be programmed with the correct codes for each device. There are typically two methods for programming:
3.2.1 Direktni unos koda
This method involves entering a specific code from a code list (usually provided with the remote or available online) for your device's brand.
- Uključite uređaj kojim želite upravljati (npr. TV, DVD uređaj).
- Press and hold the desired device button on the remote (e.g., TV, DVD) for approximately 3 seconds until the indicator light (usually red) illuminates and stays on.
- While the indicator light is on, enter the 3-digit or 4-digit code for your device's brand using the number keys.
- If the code is valid, the indicator light will turn off. If the light flashes and remains on, the code was invalid; re-enter the code.
- Testirajte daljinski upravljač pritiskom na POWER button. If the device turns off, the code is correct. If not, try the next code listed for your brand.
3.2.2 Automatsko traženje koda
If you cannot find a code or direct code entry fails, use the auto code search method.
- Uključite uređaj kojim želite upravljati.
- Pritisnite i držite pritisnuto dugme željenog uređaja (npr. TV) for approximately 3 seconds until the indicator light illuminates and stays on.
- While holding the device button, press the POWER button once. The indicator light will start flashing, indicating it is searching for a code.
- Point the remote at the device and wait for the device to turn off. This may take several minutes as the remote cycles through codes.
- Čim se uređaj isključi, odmah pritisnite dugme ENTER dugme za spremanje koda. Indikatorska lampica će se ugasiti.
- Test the remote's functions. If some functions do not work, repeat the auto search process to find a more compatible code.
4. Uputstvo za upotrebu
Once programmed, operating your Vibe Axcess 5-in-1 Universal Remote is straightforward.
- Odaberite uređaj: Pritisnite odgovarajuće dugme uređaja (npr. TV, DVD, CBL.DTC) for the device you wish to control. The indicator light will briefly illuminate to confirm selection.
- Uključivanje/isključivanje: Pritisnite POWER dugme za uključivanje ili isključivanje odabranog uređaja.
- Kontrola jačine zvuka: Koristite VOL+ i VOL- dugmad za podešavanje jačine zvuka.
- Kontrola kanala: Koristite CH+ i CH- dugmad za promjenu kanala.
- Brojčani ključevi: Use the number keys (0-9) to directly enter channel numbers or other numerical inputs.
- Navigacija: Use the directional pad (up, down, left, right) and OK dugme za navigaciju menijem.
- Kontrole medija: Koristi IGRAJ, PAUSE, STOP, REW, FWD, i REC for controlling media playback on compatible devices.
5. Održavanje
5.1 Čišćenje
To clean your remote, gently wipe it with a soft, dry cloth. Do not use abrasive cleaners, solvents, or harsh chemicals, as these can damage the remote's finish or internal components.
5.2 Zamjena baterije
When the remote's performance degrades or the indicator light fails to illuminate, it is time to replace the batteries. Follow the battery installation steps in Section 3.1. Dispose of used batteries responsibly according to local regulations.
6. Otkrivanje problema
- Daljinski ne radi:
- Provjerite jesu li baterije pravilno umetnute i nisu li ispražnjene. Zamijenite ih ako je potrebno.
- Provjerite da li ste odabrali ispravno dugme uređaja (npr. TV za vaš televizor).
- Verify that the remote is programmed with the correct code for your device. Re-program if unsure.
- Provjerite da nema prepreka između daljinskog upravljača i infracrvenog senzora uređaja.
- Neke funkcije ne rade:
- Some universal remote codes may not support all original remote functions. Try another code for your device brand using the programming steps.
- Ensure the device you are trying to control supports the specific function (e.g., not all TVs have a dedicated 'INFO' button function).
- Indikatorska lampica ne svijetli:
- Provjerite i zamijenite baterije.
- If the issue persists after battery replacement, the remote may be faulty.
7. Specifikacije
- Model: OT795-KO
- Brand: Vibe
- Dimenzije proizvoda: 10.7 x 4 x 0.8 inča
- Težina artikla: 4 unce
- baterije: Potrebne 2 AAA baterije (nisu uključene)
- Maksimalni broj podržanih uređaja: 5
- Tehnologija povezivanja: Infracrveni
- Posebna karakteristika: Universal
8. Garancija i podrška
For information regarding warranty coverage or technical support, please refer to the documentation included with your purchase or contact the retailer where the product was acquired. Specific warranty terms may vary.